What’s “Cooler” than a DIY Cat Shelter?
Article Written By: Joyce Castrigano, an FAPL volunteer and foster who donates her time to make these shelters for the outdoor cats in our community
If you have ever owned a cat, you know that they love to be warm and cozy. They take any opportunity to soak up the sunlight through a window, in a basket of laundry fresh out of the dryer, or in any available lap! These are the lucky ones.
For the feral and stray cats that live their lives outdoors, winter can be harsh. Without appropriate shelter, subzero temperatures can cause frostbite or hypothermia, which can result in death. Just because they have a fur coat, it doesn’t mean they are comfortable in the cold. Just like our indoor pets, they are always looking for a warm, dry place, which can get them into some dangerous situations.
Even though these cats are independent, they can always use our help to stay warm and survive winter. Providing an inexpensive, simple-to-construct shelter can be their saving grace. I’ve been making shelters for needy cats for several years and have tried many different methods, but I’ve found a quick and easy way to make an effective shelter that the cats truly love!
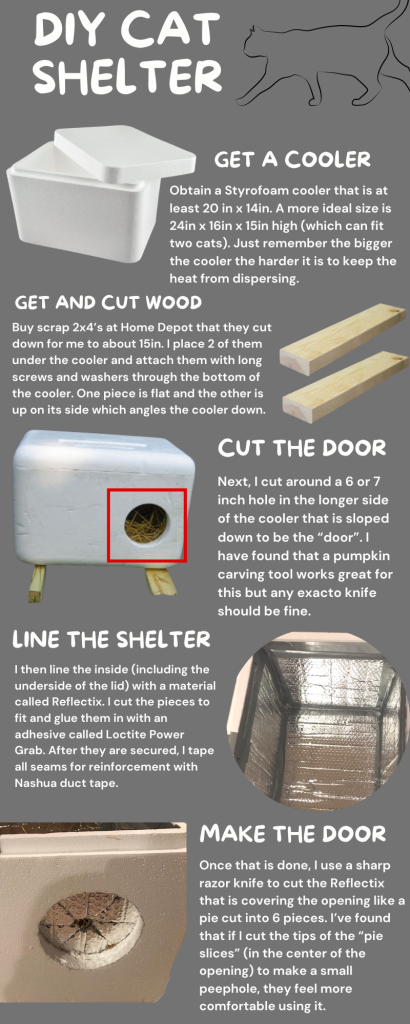
STEP 1: Obtain a styrofoam cooler

that is at least 20 in x 14in. A more ideal size is 24in x 16in x 15in high (which can fit two cats). Just remember the bigger the cooler the harder it is to keep the heat from dispersing.
***Omaha Steaks coolers work well, and most hospitals and pharmacies get coolers that they may be able to donate***
STEP 2: Buy scrap 2×4’s at Home Depot that they cut down for me to about 15in. I place 2 of them under the cooler and attach them with long screws and washers through the bottom of the cooler. One piece is flat and the other is up on its side which angles the cooler down. This way, the water and snow run off the top; if water gets inside, it will run down and drain out of the small hole that I poke in the corner with a screwdriver. (SEE INFOGRAPHIC FOR EXAMPLE)
***Having this wood base keeps the shelter off the ground and weighs it down so it doesn’t blow away***
STEP 3: Next, I cut around a 6 or 7 inch hole in the longer side of the cooler that is sloped down to be the “door”. I have found that a pumpkin carving tool works great for this but any exacto knife should be fine.
STEP 4: I then line the inside (including the underside of the lid) with a material called Reflectix. This is like Mylar blankets that reflect heat back onto the source, so the shelter is heated with the cats’ own body heat. I cut the pieces to fit and glue them in with an adhesive called Loctite Power Grab. Be careful not to get adhesive on the area that will cover the door opening. After they are secured, I tape all seams for reinforcement with Nashua duct tape. I have found these items to work well and all can be found at Home Depot.
STEP 5: Once that is done, I use a sharp razor knife to cut the Reflectix that is covering the opening like a pie cut into 6 pieces. The cat can push through it, and it closes back up behind them which really helps to keep the shelter warm. I’ve found that if I cut the tips of the “pie slices” (in the center of the opening) to make a small peephole, they feel more comfortable using it. (SEE INFOGRAPHIC FOR EXAMPLE)
After your “cooler” cat shelter is built, it’s time to fill it halfway with straw. Do not use hay or blankets, as these can retain moisture and will make the shelter wet and cold. I then put the lid back on, securing it with a couple pieces of tape on the sides so it doesn’t blow off. The tape can easily be lifted to check the straw for moisture and replaced if necessary. Sometimes the cats scratch at the outside of the cooler which can cause damage, so I cover the outside with adhesive shelf liner which deters scratching. For added warmth, a fabric pouch filled with rice and microwaved can be placed under the straw. Also, there is a product available called the Snuggle Safe heating disc which can also be microwaved and will stay warm for 12 hours.
There are other methods that can be used to build a shelter (such as using a Rubbermaid tote) and there are many good ideas online, but I have found this to be the easiest method if you can get your hands on a sturdy, appropriate-sized cooler.
Whatever type of shelter you can provide, your cat will surely thank you for it!


